Bring all the classic Greek flavors to your kitchen table with this easy and delicious Greek Chicken Marinade. Made with lemon, garlic, and fresh herbs, this chicken marinade takes just minutes to whip together and calls for only a handful of fresh and healthy ingredients.
This is my go-to, multi-purpose, and very favorite Greek chicken marinade. Of course, I have many “favorite” marinades, but this one is extra special.
What makes this particular chicken marinade so much better than the others? It is so dang easy to make. The ingredients are also basic and affordable which means no special orders from Amazon or an out-of-the-way trip to a specialty market.
A perfect balance of lemon, garlic, and fresh herbs, this Greek chicken marinade has all the right flavors in all the right places.
GREEK CHICKEN MARINADE INGREDIENTS
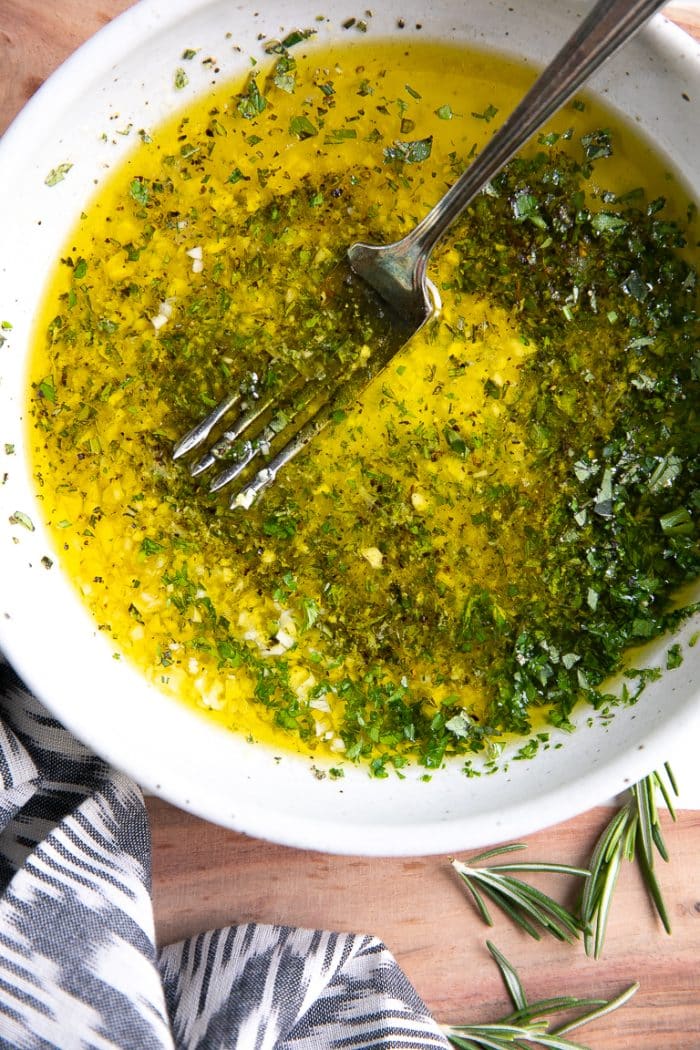
Olive oil – I can’t think of a marinade that doesn’t have at least some oil. The oil in the marinade is especially important when cooking chicken breasts as they are naturally lean and low in fat.
Lemon juice AND zest – Lemon is a popular ingredient in many popular marinades and salad vinaigrettes. The high acidity from the lemon juice helps break down the tough fibers of the chicken helping to infuse the delicious lemony flavor of the marinade. Adding zest simply multiplies the awesome lemon flavor. Fresh lemon juice is an absolute must.
Garlic – Garlic is a common ingredient in all Greek cooking and is essential to the balance of flavors in this marinade.
Fresh herbs – I added thyme, oregano, rosemary, and parsley. I also added fresh chopped herbs as it is a personal preference, but dried herbs may be substituted if needed (simply add half of what the recipe calls for). Don’t skip the herbs. Please.
Salt – I recommended that you add 1 teaspoon of salt to the marinade but you are welcome to add more or less depending on your own personal preference. Take care not to over-salt as it will distract from the wonderful, fresh flavors from the other ingredients.
Fresh cracked black pepper – Ok, friends. This is one thing that makes a big difference, freshly cracked black pepper. When it’s freshly cracked it’s as if the flavor radiates throughout the entire chicken breast. I don’t know, I can’t explain it.
HOW TO MAKE THE BEST GREEK CHICKEN MARINADE
Preparing your own marinade is as simple as whisking together a handful of ingredients, tossing it with some chicken breasts, and cooking.
Or is it…
Actually, it kinda is. However, there are a few simple tips and tricks which will make preparing your own marinade (whether it be this Greek chicken marinade, Jerk chicken marinade, or Citrus chicken marinade) a little easier.
Use an oil that makes sense. In other words, use an oil with a matching flavor profile. In this case, olive oil is the best choice. If we were preparing an Asian-style marinade, we would think about adding sesame oil for extra flavor.
Fresh ingredients are the best ingredients. With the exception of certain herbs, you really want to use only fresh ingredients. This is especially important for any kind of citrus juice and garlic. It is worth the extra few minutes of prep time (trust me).
Invest in a microplane. This is one of my top 10 must-have kitchen tools. It’s what I use to zest citrus and grate ginger. In other words, it gets really hard jobs done super duper fast.
You only need to marinate your chicken for 30 minutes. Of course, you can marinate it for longer, but with this Greek chicken marinade, you don’t really need to marinate it for hours and hours.
Never EVER consume used chicken marinade unless it is boiled first. Just think about it- would you lick a raw chicken breast? No. So please, once the marinade has come in contact with raw chicken boil it or DUMP IT OUT.
Now that you have all my tips for preparing a successful marinade, let’s make the thing.
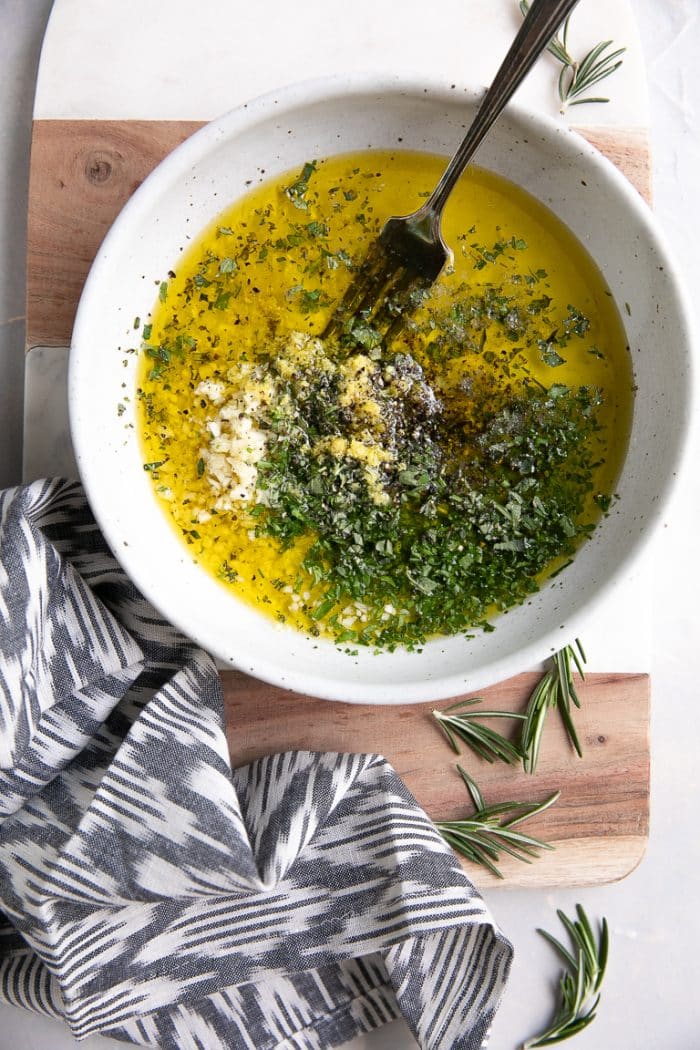
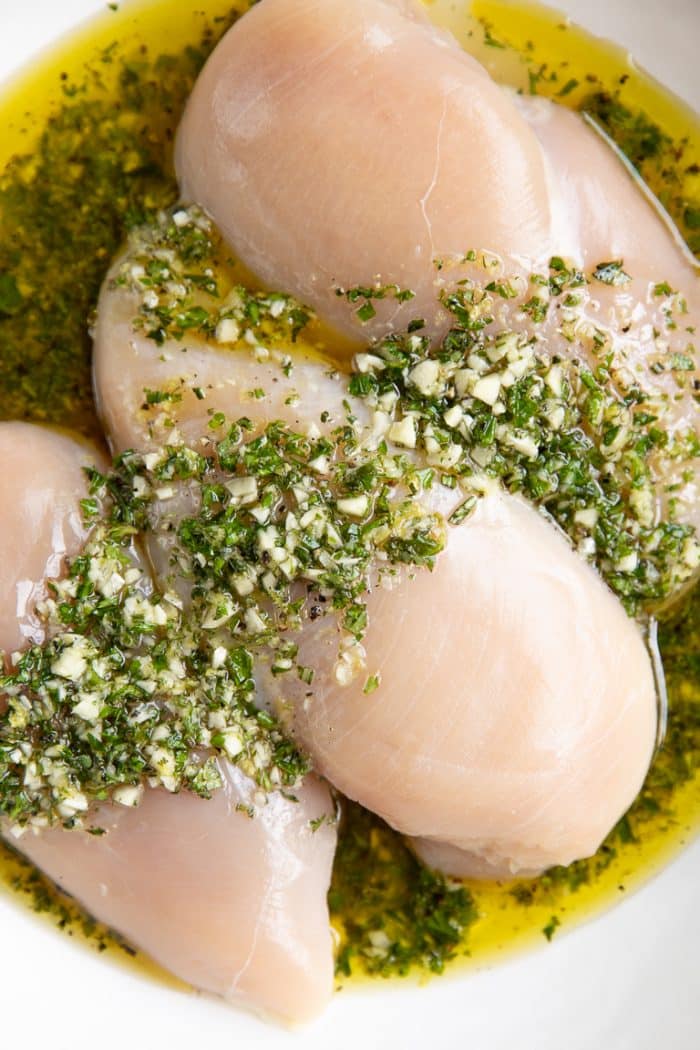
First, add all ingredients for the marinade (olive oil, garlic, lemon juice, lemon zest, fresh thyme, fresh oregano, fresh rosemary, fresh parsley, salt, and black pepper) to a large shallow mixing bowl. Mix well to combine. Add the chicken breasts to the marinade and mix well to coat in the marinade. Allow chicken to marinate for at least 30 minutes to two hours.
HOW LONG CAN YOU MARINATE YOUR CHICKEN?
I have made this Greek chicken marinade many times over the years and each time with a different total marinade time.
Time allowing, I would try to aim for anywhere between 30 minutes to 2 hours. That said, you don’t have to marinate your chicken for that long. If you only have 10 minutes, that’s certainly better than no time at all.
On the flip side, if you are preparing this ahead of time and need to leave the chicken to marinate overnight, that is perfectly fine, too. Simply cover your marinating chicken with plastic wrap and keep stored in the refrigerator until ready to grill.

HOW TO GRILL THIS GREEK MARINATED CHICKEN
Everyone has their own method of grilling chicken. My method is to start with a slightly higher temperature, grill for 5 minutes or so, and then reduce the heat. If you have a grilling method that you know and love, feel free to stick to what you know best.
Marinate the chicken. Add the chicken breasts to the marinade and mix well to coat in the marinade. Allow chicken to marinate for at least 30 minutes to two hours.
Prepare the grill. As the chicken marinates, clean the grill grates and lightly oil with vegetable oil or cooking spray. Set grill to medium-high heat.
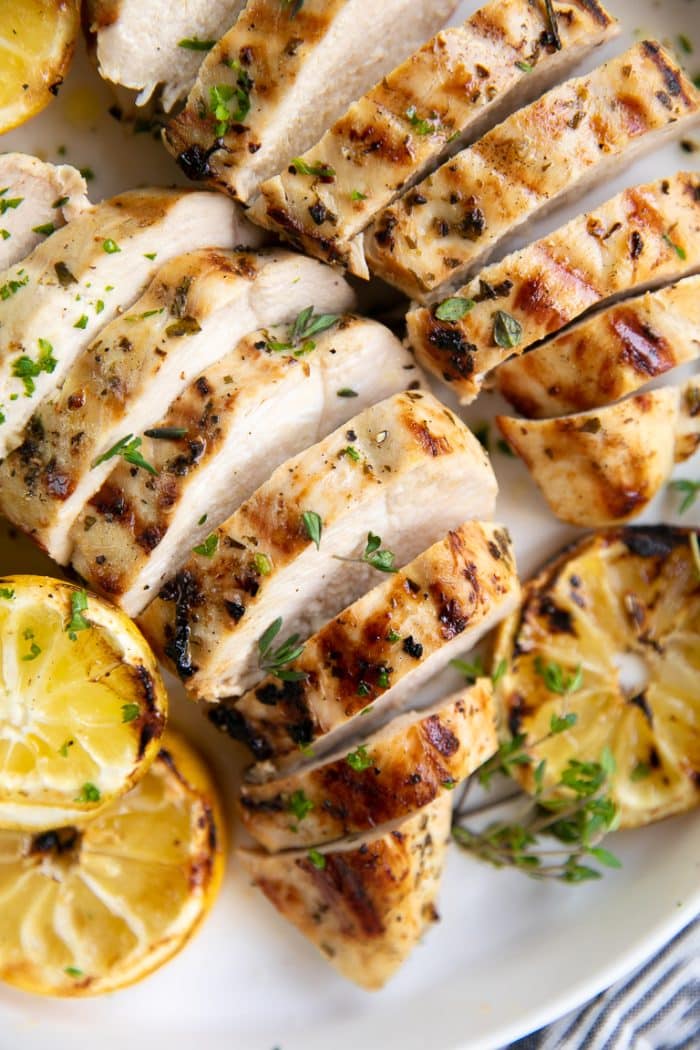
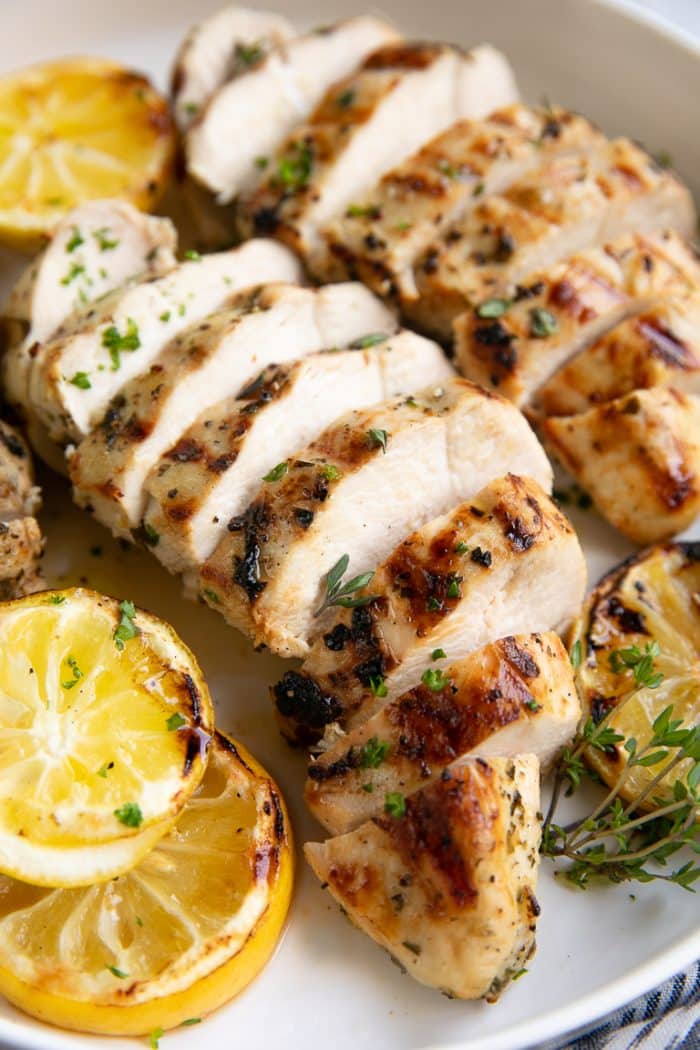
Grill the chicken. Remove the chicken from the marinade and place directly on the grill. Discard remaining marinade. Cover the grill and allow the chicken to cook for approximately 5 minutes before reducing heat to medium. Allow chicken to cook for an additional 2 minutes, then use tongs to flip each breast over. Grill for an additional 5-7 minutes (or longer), or until the thickest part of your chicken registers 160 degrees F. with a digital meat thermometer.
Thicker chicken breasts will take longer to cook. I highly recommend the use of a digital meat thermometer when cooking any and all meats.
Allow chicken to rest. Remove chicken breasts from the grill and set aside to a clean plate. Tent with foil and allow to rest for 5 minutes before slicing and serving.
CAN YOU BAKE GREEK CHICKEN?
Yes, absolutely. I love to bake this Greek marinated chicken recipe whenever I want a more hands-off dinner.
Prepare the marinade as outlined above and marinate the chicken for (at least) 30 minutes.
Preheat the oven to 400 degrees F and line a large baking sheet with parchment paper or aluminum foil.
Arrange the chicken on the prepared baking sheet. Discard any remaining marinade.
Bake until internal temperature reaches 160-165 degrees F as read with a digital meat thermometer.
Remove from the oven and allow to rest for 5 minutes before serving.
HOW TO SERVE GRILLED GREEK MARINATED CHICKEN
The uses for this rockstar marinated chicken is endless. Here are some of my favorite ideas.
Serve with a platter of hummus, flatbread, and your favorite chopped veggies like cherry tomatoes, cucumber, red onions, and olives.
Add to your favorite cold pasta salad.
Serve with this Easy Chopped Mediterranean Salad for a complete meal.
Make in bulk and turn leftovers into yummy meal prep bowls like these Chicken Shawarma Quinoa Bowls.
Keep things low carb and serve with this flavorful Cucumber Salad.

DON’T FORGET TO PIN AND SHARE THIS EASY AND DELICIOUS GREEK CHICKEN MARINADE RECIPE AND ADD IT TO YOUR NEXT WEEKLY MEAL PLAN!
LOOKING FOR SOMETHING SPECIFIC? CLICK HERE TO SEARCH BY INGREDIENT
REMEMBER TO SUBSCRIBE TO THE FORKED SPOON NEWSLETTER FOR FREE AND RECEIVE WEEKLY RECIPE NOTIFICATIONS DELIVERED STRAIGHT TO YOUR INBOX!
COURSE: Main Course
CUISINE: American, Greek
KEYWORD: Greek Chicken Marinade
PREP TIME:10 minutes
COOK TIME:20 minutes
MARINATE:2 hours
TOTAL TIME:2 hours 30 minutes
SERVINGS: servings
CALORIES: 312kcal
Ingredients
1/2 cup olive oil
5 cloves garlic - minced
2 lemons - juiced
1 lemon - zested
1 tbsp fresh thyme - chopped
1 tbsp fresh oregano - chopped
2 tsp fresh rosemary - chopped
1 tbsp fresh parsley - chopped
1 tsp salt
1 tsp freshly ground black pepper
6 large chicken breasts - (approximately 4 pounds)
Instructions
Prepare the marinade. Add all ingredients for the marinade (olive oil, garlic, lemon juice, lemon zest, fresh thyme, fresh oregano, fresh rosemary, fresh parsley, salt, and black pepper) to a large shallow mixing bowl. Mix well to combine.
Marinate the chicken. Add the chicken breasts to the marinade and mix well to coat in the marinade. Allow chicken to marinate for at least 30 minutes to two hours.
Prepare the grill. Clean grill grates and lightly oil with vegetable oil or cooking spray. Set grill to medium-high heat.
Grill the chicken. Remove the chicken from the marinade and place directly on the grill. Discard remaining marinade. Cover the grill and allow chicken to cook for approximately 5 minutes before reducing heat to medium. Allow chicken to cook for an additional 2 minutes, then use tongs to flip each breast over. Grill for an additional 5-7 minutes (or longer), or until the thickest part of your chicken registers 160 degrees F. with a digital meat thermometer.
Allow chicken to rest. Remove chicken breasts from the grill and set aside to a clean plate. Tent with foil and allow to rest for 5 minutes before slicing and serving. Enjoy!